

Available Now

How to Fill Concrete Driveway Cracks
Leo Donovan • Nov 17, 2023
To fill concrete driveway cracks, start by cleaning and widening them. Choose the right filler based on crack type and size. For hairline cracks, use liquid fillers and smooth them. Wider cracks need epoxy or polyurethane sealant, while deep potholes require patching compound. Finally, seal your entire driveway for extra protection.
· Regular maintenance is essential to prevent driveway cracks, enhance curb appeal, and extend the lifespan of your concrete driveway.
· Different types of cracks require specific filler materials, such as epoxy for hairline cracks and patching compound for deep potholes.
· Safety precautions, including proper attire and ventilation, are crucial when working with concrete and chemicals.
· Cleaning and preparing cracks are vital steps to ensure the filler bonds effectively and provides a long-lasting repair.
· Sealing your driveway after crack filling adds an extra layer of protection, prolonging the life of your concrete surface and enhancing its appearance.
Concrete driveways are a durable and long-lasting addition to any home. They provide a smooth surface for vehicles, enhance curb appeal, and can withstand the test of time. However, like any other part of your property, concrete driveways can develop issues over the years. One of the most common problems homeowners face is cracks in their concrete driveways. These unsightly blemishes not only diminish the aesthetic appeal but can also lead to more significant problems if left unaddressed. If you've been pondering about the best methods to fix concrete driveway cracks, you're in the right place.
In this comprehensive guide, I'll take you through the process of repairing concrete driveway cracks step by step. Whether you're a complete beginner or someone looking to refine their DIY skills, this guide will provide you with the knowledge and confidence to tackle this essential maintenance task. But first, let's understand why maintaining your concrete driveway is so crucial.
The Importance of Maintaining Your Concrete Driveway
Your driveway is not just a functional part of your property; it's also one of the first things people notice about your home. A well-maintained concrete driveway not only adds to your home's curb appeal but also helps maintain its value. Here are a few reasons why keeping your concrete driveway in good condition is essential:
· Enhanced Aesthetics: A cracked and damaged driveway can detract from your home's overall appearance. A well-maintained driveway, on the other hand, can boost your property's visual appeal.
· Safety: Cracks and potholes in your driveway can create trip hazards for pedestrians and pose risks to vehicles. Repairing these issues ensures the safety of your family and guests.
· Preventing Further Damage: Neglecting cracks can lead to more significant structural problems. Water can seep into cracks, freeze, and expand, causing the cracks to widen and potentially leading to costly repairs.
· Longevity: Regular maintenance and repairs can extend the life of your concrete driveway, saving you money in the long run.
For those looking to explore more about the intricacies of concrete work and the range of solutions available, visiting
Concrete Cairns could provide a wealth of information.

Regular maintenance of a concrete driveway can prevent weed growth through cracks and joints, maintaining its clean and polished appearance.
Proper maintenance, including sealing, can significantly extend the lifespan of a concrete driveway, potentially doubling its durability compared to neglecting maintenance.
Neglecting maintenance can lead to water seepage into cracks, which, when frozen, can expand and cause more extensive damage over time.
Routine maintenance not only saves money on costly repairs but also enhances the overall curb appeal of your property, potentially increasing its resale value.
Failure to maintain your concrete driveway can result in surface deterioration and the need for costly resurfacing or replacement, which can be avoided with regular care.
Opting for a professional concrete driveway solution can ensure top-notch results that last.
Now that we understand why maintaining our concrete driveway is essential let's dive into the heart of the matter - dealing with those troublesome cracks.
Understanding Concrete Driveway Cracks
| Crack Type | Description |
|---|---|
| Hairline Cracks | Very thin surface cracks |
| Wide Cracks | Substantial, wider cracks |
| Fissures | Long, straight cracks |
| Potholes | Deep, often irregular holes |
Before we get into the nitty-gritty of fixing cracks, it's crucial to understand the different types of cracks you might encounter on your driveway.
Different Types of Cracks
· Hairline Cracks: These are small, surface-level cracks that are typically less than 1/8 inch wide. They are often cosmetic in nature and do not pose significant structural issues.
· Wide Cracks: Wide cracks are more substantial, measuring between 1/8 inch to 1/4 inch in width. While they may not be an immediate structural concern, they can worsen over time if not addressed.
· Fissures: Fissures are long, straight cracks that can run across the entire width of the driveway. They are usually caused by settlement and can be more challenging to repair.
Factors Contributing to Driveway Cracks
Several factors can contribute to the development of cracks in your concrete driveway:
· Weather: Extreme temperature fluctuations, freezing, and thawing can cause concrete to expand and contract, leading to cracks.
· Age: As concrete driveways age, they become more prone to cracking due to wear and tear.
· Usage: Heavy vehicles and constant traffic can accelerate the wear and tear on your driveway, leading to cracks and potholes.
💡 Ground Movement: Natural shifting or settling of the ground beneath the driveway can cause cracks.**
Now that we have a better understanding of the problem, let's move on to the practical part - fixing those cracks.
Tools and Materials You'll Need

Before you begin repairing your concrete driveway cracks, you'll need to gather the necessary tools and materials. Here's a list to get you started:
Tools:
· Safety Gear: Safety should always come first. Wear safety goggles to protect your eyes and a dust mask to avoid inhaling concrete dust.
· Wire Brush: A wire brush is essential for cleaning out debris and loose concrete from the cracks.
· Chisel: You'll need a chisel to widen cracks and create a better bonding surface for the filler.
· Caulk Gun: A caulk gun is used to apply crack filler efficiently.
· Trowel: A trowel helps smooth and level the filler.
· Scraper: A scraper is useful for achieving a smooth finish after filling.
· Gloves: Protect your hands with durable work gloves.
Materials:
· Concrete Crack Filler: The type of filler you choose depends on the size and depth of the cracks. Options include epoxy filler, polyurethane sealant, and concrete patching compound.
· Driveway Sealant: After crack filling, you'll want to seal the entire driveway for added protection.
Now that you have your tools and materials ready, it's time to consider safety precautions.
Safety Precautions
Working with concrete and chemicals requires proper safety measures. Here are some guidelines to ensure your safety during the crack repair process:
· Proper Attire: Wear long sleeves, pants, and closed-toe shoes to protect your skin from contact with chemicals and concrete.
· Safety Gear: As mentioned earlier, don safety goggles to shield your eyes from debris and a dust mask to prevent inhaling dust particles.
· Ventilation: Ensure you're working in a well-ventilated area to minimize exposure to fumes from concrete products.
· Read Labels: Always read and follow the manufacturer's instructions on the products you're using.
With safety in mind, let's move on to the first step in the crack repair process.
Preparing the Cracks
Properly preparing the cracks is crucial to ensure the filler adheres effectively. Here's how you can do it:
· Clean the Cracks: Use a wire brush and chisel to remove any loose debris, dirt, or vegetation from the cracks. A clean surface is essential for a successful repair.
· Wash the Area: If the cracks are especially dirty, consider using a garden hose or a pressure washer to clean the area thoroughly. Allow it to dry before moving on to the next step.
With the cracks cleaned and prepped, it's time to choose the right filler.
Choosing the Right Filler
| Filler Type | Suitable for |
|---|---|
| Epoxy Filler | Hairline cracks, wide cracks |
| Polyurethane Sealant | Wide cracks, flexible repairs |
| Patching Compound | Deep potholes, substantial damage |
Selecting the appropriate filler is essential for a successful repair. Different types of concrete crack fillers are available, each suitable for specific crack sizes and types. Here are some common options:
· Epoxy Filler: Epoxy is a versatile filler suitable for both hairline cracks and wider cracks. It's known for its durability and strong bonding properties.
· Polyurethane Sealant: Polyurethane sealants are flexible and resistant to water. They work well for cracks that may expand and contract with temperature fluctuations.
· Concrete Patching Compound: This is an excellent choice for larger cracks and deep potholes. It's designed to be thicker and can handle more substantial repairs.
When selecting a filler, consider the size and type of cracks you're dealing with. Now, let's go through the step-by-step process of filling different types of cracks.
Filling Hairline Cracks
Hairline cracks are often the easiest to fix and are primarily cosmetic in nature. Here's how to fill them:
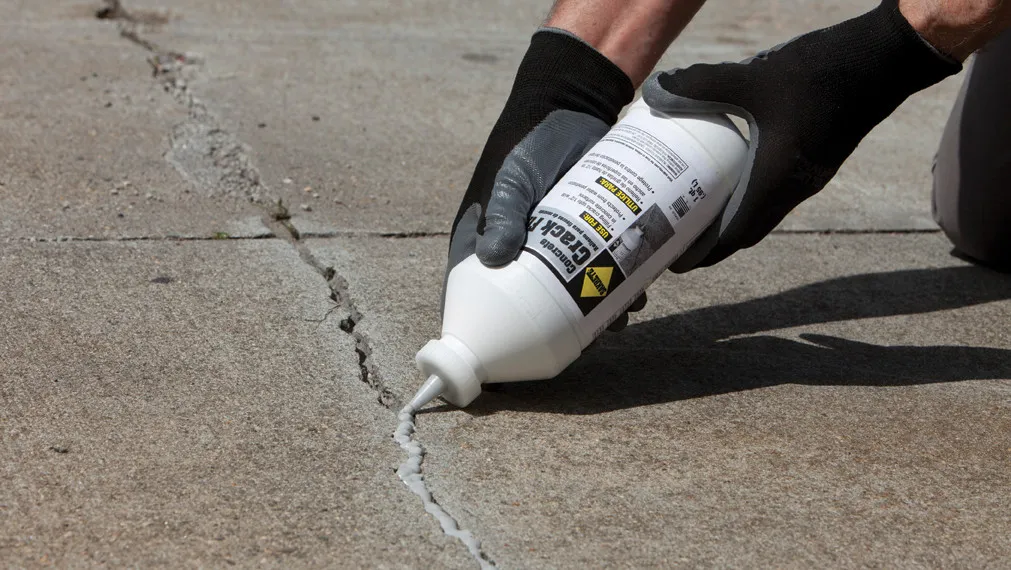
· Select a Liquid Filler: For hairline cracks, it's best to use a liquid filler, such as an epoxy or polyurethane filler.
· Apply the Filler: Load the liquid filler into a caulk gun and carefully apply it along the crack. Be sure to fill the crack completely but avoid overfilling.
· Smooth the Surface: Use a scraper or a wet finger to smooth the surface of the filler and make it level with the rest of the driveway.
By following these steps, you can effectively repair those fine, hairline cracks that can mar the appearance of your driveway. But what if you're dealing with wider cracks?
Repairing Larger Cracks
Wider cracks require a slightly different approach. Here's how to repair them:
· Clean the Crack: Start by cleaning the crack as mentioned earlier, using a wire brush and chisel.
· Choose the Right Filler: Select a suitable filler for wider cracks. Epoxy or polyurethane sealant can work well here.
· Apply the Filler: Load the chosen filler into a caulk gun and apply it along the crack. Fill the crack generously but avoid overapplication.
· Level the Filler: Use a scraper or a trowel to level the filler with the surrounding driveway surface. Ensure a smooth finish.
These steps will help you effectively repair wider cracks, preventing them from worsening over time. But what about those deep potholes that can be a real headache?
Dealing with Deep Potholes

Deeper cracks and potholes require a thicker filler material and careful application. Here's how to handle them:
· Clean and Widen the Crack: Begin by cleaning the crack and widening it using a chisel. This will create a better surface for the filler to adhere to.
· Select a Thick Filler: Opt for a thicker filler like a concrete patching compound designed for deeper repairs.
· Fill the Pothole: Apply the patching compound generously to fill the pothole or deep crack. Press it down firmly to eliminate air gaps.
· Level and Smooth: Use a trowel to level the filled area, making it flush with the surrounding driveway surface. A smooth finish is crucial for a polished look.
Dealing with deeper cracks and potholes may require a bit more effort, but it's essential to ensure a lasting repair. With the cracks filled and leveled, let's move on to the finishing touches.
Smoothing and Finishing
Achieving a smooth and uniform surface after filling the cracks is essential for a polished look. Here are some techniques to consider:
· Scraping: Run a scraper over the filled areas to create a smooth surface. Be sure to blend the filler seamlessly with the rest of the driveway.
· Wet Finger Method: Alternatively, you can use a wet finger to smooth the filler, especially if you're working with liquid fillers like epoxy.
Once you've achieved a smooth finish, it's time to take the extra step of sealing your entire driveway.
Sealing the Driveway
Sealing your driveway after crack filling is an essential part of the maintenance process. Here's why it matters:
· Protection: A quality driveway sealant provides an additional layer of protection against moisture, chemicals, and other damaging elements, extending the life of your driveway.
· Enhanced Appearance: Sealing the driveway enhances its color and appearance, giving it a fresh and appealing look.
Here's how to seal your driveway:
· Choose the Right Sealant: Select a driveway sealant suitable for your concrete type and climate conditions.
· Clean the Driveway: Before applying the sealant, ensure your driveway is clean and free of debris.
· Apply the Sealant: Follow the manufacturer's instructions to apply the sealant evenly across the entire driveway surface. You may need a roller or a squeegee for this task.
· Allow to Cure: Let the sealant dry and cure according to the manufacturer's recommendations. This typically takes a day or two, depending on the product and weather conditions.
With your driveway sealed, you've taken significant steps toward ensuring its longevity and maintaining its attractive appearance. However, your work doesn't end here.
Maintenance Tips
To keep your concrete driveway in optimal condition, consider these maintenance tips:
· Regular Inspections: Periodically inspect your driveway for new cracks or signs of wear. Address any issues promptly to prevent them from worsening.
· Resealing: Depending on the climate and usage, you may need to reseal your driveway every few years to maintain its protective barrier.
· Cleaning: Regularly sweep or hose down your driveway to remove debris, leaves, and dirt that can contribute to cracks.
By following these maintenance tips, you can ensure that your repaired concrete driveway continues to serve you well for years to come.
Common Mistakes to Avoid

To ensure a successful concrete driveway crack repair, it's essential to avoid common mistakes that homeowners often make:
· Neglecting Small Cracks: Don't ignore hairline cracks, as they can worsen over time. Address them early to prevent further damage.
· Skipping Cleaning: Properly cleaning and preparing the cracks is crucial for effective filler adhesion. Skipping this step can lead to subpar results.
· Overfilling: Avoid overfilling cracks, as excess filler can be challenging to level and may not bond properly.
· Inadequate Curing Time: Rushing the curing process can lead to premature wear and a compromised repair. Follow the manufacturer's instructions for curing times.
Conclusion
Repairing concrete driveway cracks is a DIY project that can save you money and enhance the longevity and appearance of your driveway. By following this comprehensive guide, you've gained the knowledge and skills necessary to tackle this essential maintenance task. Remember, a well-maintained driveway not only adds to your home's curb appeal but also provides a safe and durable surface for your vehicles.
I encourage you to take action and apply these step-by-step instructions to repair your concrete driveway cracks. With the right tools, materials, and safety precautions, you'll be well-equipped to achieve a successful repair. Don't wait—take pride in your home and ensure your driveway remains in top condition for years to come.
Additional Resources and References
In crafting this comprehensive guide on "How to Fill Concrete Driveway Cracks," I've drawn upon a wealth of knowledge from trusted sources, expert opinions, and industry standards to ensure the accuracy and reliability of the information presented.
https://www.maintainitall.com/why-is-driveway-maintenance-important
https://www.angi.com/articles/what-causes-concrete-and-asphalt-driveway-cracks.htm
FAQs
Q: Can I use regular caulk to fill concrete driveway cracks?
Standard caulk is not recommended for concrete driveway crack filling. It lacks the durability and bonding properties needed for long-lasting repairs. Instead, opt for specialized concrete crack fillers like epoxy or polyurethane sealant.
Q: How long does it take for concrete driveway crack filler to dry?
The drying time for concrete driveway crack filler depends on the type of filler used and environmental conditions. Typically, it can take anywhere from a few hours to a day or more for the filler to fully cure. Always follow the manufacturer's recommendations for drying times.
Q: What's the cost of professional concrete driveway crack repair?
The cost of hiring professionals for concrete driveway crack repair varies depending on factors such as the extent of damage, location, and the contractor's rates. On average, expect to pay anywhere from $300 to $1,000 or more for professional repairs.
Q: Can I paint over the filled cracks in my concrete driveway?
Yes, you can paint over the filled cracks in your concrete driveway to create a more uniform appearance. However, it's essential to use a paint designed for outdoor concrete surfaces and follow the manufacturer's instructions for proper application.
Q: How often should I inspect and maintain my filled concrete driveway cracks?
Regular inspections are essential to catch any new cracks or signs of wear early. Perform inspections at least once a year, and consider resealing your driveway every few years to maintain its protective barrier and appearance.
GET IN TOUCH
Need more information? Speak to one of our experts and get personalised advice on your project to bring your vision to life. Contact us today to schedule your consultation or request a free consultation.
Contact Us

Decorative concrete enhances homes by offering durability, easy maintenance, and cost-effectiveness. Its versatility allows creative designs, mimicking natural materials. Plus, it's eco-friendly, using recycled materials and reducing the need for replacements, making it a smart and stylish choice for residential projects. Durable and Long-Lasting: Concrete, especially decorative options, proves resilient against weather, wear, and stains, ensuring the longevity of outdoor projects. Low Maintenance, High Impact: Minimal upkeep and periodic sealing make decorative concrete a low-maintenance yet visually appealing choice for outdoor spaces. Cost-Effective Solution: From initial installation to long-term maintenance, decorative concrete offers economic advantages over traditional materials like wood, brick, or stone. Versatility Redefined: Beyond stamped patterns, decorative concrete allows for intricate designs, logos, or artwork, providing limitless customization options for unique outdoor aesthetics. Environmental Consciousness: Decorative concrete aligns with eco-friendly practices, incorporating recycled materials and boasting a long lifespan that reduces the need for replacements, thus saving resources. Introduction In the ever-evolving landscape of outdoor home improvement, the material choices we make play a critical role in shaping the durability, aesthetics, and functionality of our living spaces. Concrete, once reserved for utilitarian purposes, has now emerged as a go-to option for outdoor projects. In this comprehensive guide, we'll delve into the multifaceted advantages of utilizing concrete, especially decorative concrete, in transforming outdoor spaces. If you're considering a concrete transformation for your outdoor haven, explore the possibilities with https://toowoombaconcreters.net.au/ .

The lifecycle of concrete installation is like telling a story from digging up raw materials to building and maintaining structures. We explore its impact on the environment, discover ways to make it eco-friendly, and marvel at how well-kept concrete structures can last for ages. · Concrete Lifecycle Phases: Understand the sequential stages, from raw material extraction to end-of-life considerations, to appreciate the holistic journey of concrete installation. · Environmental Impact Awareness: Grasp the environmental implications of concrete production, including greenhouse gas emissions and the importance of Life Cycle Assessment (LCA) for sustainable decision-making. · Sustainable Practices: Explore low-carbon alternatives, the incorporation of recycled materials, and innovative technologies for sustainable concrete practices. · Longevity and Maintenance: Acknowledge the potential for concrete structures to last well beyond their initial design lifespan with proper maintenance and repair, considering environmental conditions and design parameters. · Global Impact: Recognize concrete's role in addressing global challenges, aligning with Sustainable Development Goals (SDGs), and contributing to living standards frameworks for growth, distribution, and sustainability. Concrete, the unsung hero of our urban landscapes, holds a captivating tale within its seemingly stoic structure. This journey from raw materials to the eventual twilight of a concrete structure encompasses a myriad of stages that shape our built environment. Let's peel back the layers, incorporating essential facts seamlessly into the narrative. For those looking to explore the world of concrete further, you might find the services offered by https://townsvilleconcretingcompany.com.au/ to be a valuable resource.

In 2023, trends in landscaping focus on sustainability and creativity. Native plants promote a healthier environment, while retaining walls become artistic features, supporting wildlife. Smart technology adds efficiency, and gravel landscaping offers a low-maintenance, modern look. Sustainability remains crucial for a thriving outdoor space. · Native Plants for Sustainability: Incorporate native plants for a sustainable and eco-friendly landscape, promoting biodiversity and reducing maintenance needs. · Retaining Walls as Creative Elements: Utilize retaining walls not only for structural purposes but as creative canvases, adding aesthetic appeal and supporting local wildlife. · Smart Technology Integration: Embrace smart technology for efficient landscaping, from automated irrigation systems to outdoor lighting, enhancing both convenience and energy efficiency. · Gravel Landscaping for Low Maintenance: Explore gravel landscaping as a low-maintenance alternative, offering a clean and contemporary look while encouraging outdoor activities. · Sustainability as a Guiding Principle: Emphasize sustainable landscaping practices for the long-term, contributing to property value, biodiversity, and the overall well-being of your outdoor space.
Fast & Free Estimates, Call Now.
Contact us anytime via phone call or email.

Cairns' Best Concreters since 2010.
Licensee: Michael Stubbs
QBCC:
1267154
This is a referral .website, please visit our Privacy Policy and Terms of Service for more information.
Services
Working hours
- Mon - Sun
- -
Don't be shy give us a call! If we're too busy to take your call right away, one of our specialists will get back to you as soon as possible.
New Paragraph